Last time I had the following situation: I wanted to remote connect to my workstation from another workstation like in the following image:

My current workstation is the left one (I will call it “workstation“) and I want to connect to the computer on the right (“server“). The workstation is running Windows XP, the server is running on Ubuntu Feisty.
- Setup Server(SSH+VNC): You have to install SSH and activate the VNC-Server, to be able to securely connect to your server.
- Install SSH: Just install the SSH server by entering the following in bash:
sudo apt-get install ssh 
 Enable VNC: VNC is already installed on yor Ubuntu system, so you only have to enable it. Navigate to System -> Preferences -> Remote Desktop. Now you should activate “Allow other users to view my desktop“, “Allow other users to control my desktop“, and for security purpose “Require the user to enter this password” and provide a secure password. Then click the Close-button. Now your VNC-server should be ready to use.
- Install SSH: Just install the SSH server by entering the following in bash:
- Setup Rooter (SSH Forwarding). If your server is directly connected to the internet (modem) you can skip this step. On my SMC-router this feature is called virtual server. You have to forward the SSH-port (22) to the IP address of your server. (here: 192.168.123.2)
- Download and Install Putty: If you search Google for putty, the first result will be a download page, where you should download eighter the windows installer (putty-0.60-installer.exe) or the single putty program (putty.exe) . (I placed the single file into %windir%system32 for fast access per Start -> Run.)
- Start Putty and set it up:
- Start putty.exe (e.g. if you put it in system32 per
Start -> Run putty.exe 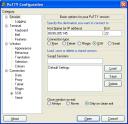 Enter the hostname, you want to connect to on the first startpage “Session“. Here this is the router. You have to enter the external IP (in concreto: 80.80.205.145). If your “server” is directly connected to the internet you have to enter the external IP of your server. (This is the case if you have only a single PC and this PC is directly connected to the modem of your provider.
 Setup a tunnel by going to “Connection -> SSH -> Tunnels“. Here you enter as source port 5900 (the default VNC-Port which is used by Ubuntu if you installed it like me). As Destination you enter the internal server-ip with the VNC-Port (in concreto: 192.168.123.2:5900) and Click Add. Make sur, that you use the internal IP of your server not e.g. an IP-Adress of your router. (I made this mistake and wondered why nothing happend 😉 )
 Save your session and connect, so you can recall it later quickly by going back to “Session”. Type a meaningful name for your session below the “Saved Session” label and click “Save“. Now you can restore your session always by selecting it and click “Load“. Now you can click “Open” to connect to your server.
- Start putty.exe (e.g. if you put it in system32 per
- Connect to your workstation: Now you will get a window where your username and password will be asked. Enter you login credentials to connect to your server and establish a SSH-tunnel.
- Connect to your server using VNC:
- Download and install VNC. There are lots of free VNC apps for windows out there e.g. UltraVNC or TightVNC. Note that you only need the viewer.
- Start the vncviewer and connect to localhost (127.0.0.1) and enter your password which you provided in step 1.2.
- Now you should be connected to your home server 🙂


