Archive for May, 2009

Elektronische Signatur mit Gemalto auf Ubuntu Jaunty

deutsch This post is in german.

Nachdem nun gratis Card-Reader ausgeteilt wurden und die Bürgerkarte (e-card) aktiviert wurde, habe ich dieses Angebot natürlich genutzt. Mit diesem Angebt kann man schnell elektonisch signieren, e-Voten, sich krank melden, Behördenwege oder E-Banking machen.

Man hat gratis den gemalto PC USB-SL Reader bekommen. Ich habe gehört, dass derzeit nur der Reader von a-trust sicher sein soll, dies jedoch nur aus persönlichen Gesprächen. Dies wäre bedenklich insb im Hinblick auf das verfassungsgesetzlich gewährleistete Recht der geheimen Wahl.

Ich wollte diesen Reader nun zum Laufen bringen. Ubuntu 9.04 bringt zum Glück schon die Treiber mit, sodass ich mit die Anleitung für ältere Ubuntus ersparen konne. Man benötigt jedoch eine Software, die sog Büprgerkartenumgebung. Diese downloadet man sich für Linux mit 32Bit oder für Linux mit 64 Bit.

Nun entpackt man das Archiv und wechselt in den Ordnet tdb-release. Danach installiert man das Programm mit root-Rechten.sudo ./setup.sh
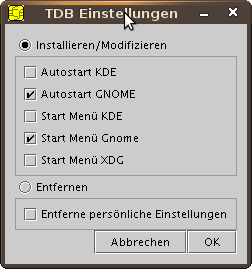
TDB EinstellungenIm Dialog wählt man nun Autostart GNOME und Start Menü Gnome für Ubuntu bzw Autostart KDE und Start Menü KDE für Kubuntu.

Nach einem Klick auf OK wird das Programm installiert.

Nun müssen wir noch testen ob das Programm funktioniert. Dazu gehen wir auf die Seite um die Bürgerkarte zu testen. Dort klickt man auf den großen grünen Button Bürgerkarte testen. Die Online BKU hat bei mir nicht funktioniert, deshalb haben wir auch die lokale Software installiert. Daher wählt man Lokale BKU.
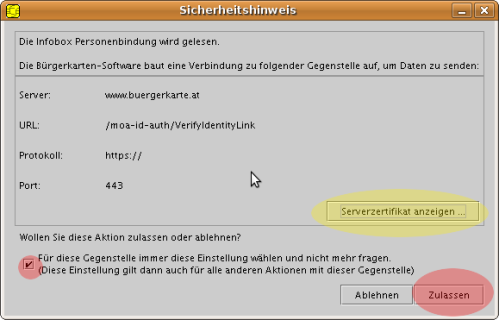
Sicherheitshinweis

Nun poppt ein Sicherheitshinweis auf. Nachdem man das Zertifikat kontrolliert hat klickt man die Checkbox an und klickt auf Zulassen.

Problem mit Karte

Hat man keine Bürgerkarte (e-card) im Kartenleser stecken, so erscheint der Dialog Problem mit Karte auf der rechten Seite. Man steckt daher seine e-card mit dem Chip nach oben und nach innen in den Leser und klickt auf OK.

PIN Eingabe

Danach muss man den vierstelligen PIN eingeben, den man bei der Aktivierung angegeben hat und auf OK klicken.

Nun muss man rechts unten seinen sechsstelligen PIN eingeben, welchen man ebenfalls bei der Aktivierung bekommen hat und OK klicken.
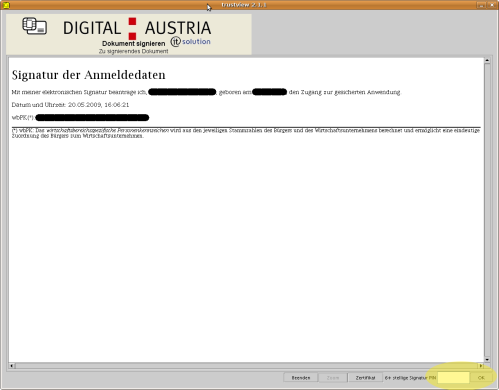
trustview

Nun sollte man einen Erfolgshinweis bekommen:

Success

Asus eee 1000HE and Ubuntu Jaunty UNR (9.04)

Last week I installed Ubuntu Jaunty UNR on my Asus eee 1000HE. I followed the tutorial at ubuntu.com with a 1GB usb stick.

I inserted the USB with the Live-System. It started without any problems. During the live session the WLAN did not work (It worked after the complete install). I partitioned manually and used only sda1 as root (/) with ext4 as filesystem.

Drive d:\

After the complete install and reboot I did not found my drive d:\. It was not mounted automatically. To mount the drive permanently do the following:
sudo mkdir /media/data

Now append the following line to your /etc/fstab (You have to edit with sudo)
/dev/sda2    /media/data/    ntfs    defaults    0    2

Now you have to refresh your mount:
sudo mount -a

Using Ubuntu Jaunty on my Asus eee 1000he netbook

Universe was activated (uncommented) in /etc/apt/sources.list but the apt-cache was not refreshed yet. I needed Universe for gparted. You can easily refresh your apt-cache and get Universe by:sudo apt-get upddate

Most of the time I keep the brightness at the minimum. Sometimes (I do not know why) the brightness increases unexpected.

The Mouse works fine. I can use three fingers to right click and two fingers to simulate the mouse wheel – perfect :-).

If you want to get your normal Ubuntu Desktop you can switch to that mode easily by  Preferences ->Desktop Switcher. This tool seems to be buggy at the moment. I got troubles with Ubuntu, but I do not know if they were caused by the desktop.switcher.

If you want to install deb-packages in firefox there is no preconfigurred action. The best way ist to open the .deb with /usr/bin/gdebi-gtk.

Especially for eee there are the eee-tools.You can enable and disable WLAN, bluetooth, the camera and card reader, set some Hotkeys and set the performance level.To start the tools restart your computer or start eee-control-tray with <Alt>+<F2>.

Because the battery life was about two hours shorter than with windows (about 7 insteat of 9.5 hours) i wanted back to Windows. I also destroyed my desktop and do not know why, so the alternative was to reinstall Ubuntu.

Back to Windows

The 1000he has a nice “Quick Recovery System”. You can enter if you press <F9> three times after the boot (Normally I press it as long as the Screen showes up). After installing Ubuntu (and therefore Grub) you can enter the Quick Recovery System as the other operationg Systems (Windows XP) in your grub loader. The reinstall took about 20 Minutes (Did I say it is a really nice tool?). After rebooting Windows did not start anymore and Ubuntu was erased. I knew, that fixmbr was the key to get it running again, but the 1000he has no optical drive. So I searched for an alternative for fixmbr.

I found a pretty cool tool called Super Grub Disk (SGD). I booted the Ubuntu with my live USB-Stick and downloaded the SGD for USB.I followed the tutorial to get SGD on my USB-Stick. The 1GB Stick was to small, so I had to take another one. You can see your mounted USB-Sticks with mount

My Live USB-Stick with Ubuntu was /dev/sdb1 and the new one was /dev/sdc1. I think I did the following: Downloaded SGD for USB, extracted it to the root of my new USB stick and executed the following: (You should close your new USB-Stick window and read the tutorial mentioned above):cd /media/disk (your new usb-stick)
sudo -s
grub

In Grub now execute the following:
device (hd0) /dev/sdc
root (hd0,1) (Maybe it was hd0,0)
setup (hd0)
quit

If you get a Grub Error 18 your USB-Stick is probably too small.

No you can restart your computer with only the SGD-Stick in your laptop. I do not know what I clicked but maybe I followed Howto Boot Windows without problems. You can search samples for Boot problems or just try to navigate through the menu. For me that worked.


May 2009
M T W T F S S
 123
45678910
11121314151617
18192021222324
25262728293031

Blog Stats

  • 383,746 hits